How to Clear Your WordPress Cache: A Comprehensive Guide
When managing a WordPress site, it’s not uncommon to encounter situations where changes you’ve made don’t appear right away. This often happens due to cached data. In this guide, we’ll explain what caching is, how it functions, and provide step-by-step instructions on clearing your WordPress cache, covering browser cache, caching plugins, and server cache.
Understanding Cache
Cache refers to the storage of web pages, files, images, and other elements to enable quicker access when revisiting websites. Various types of cache exist, including:
- Browser Cache: Elements stored in your web browser for faster loading times.
- Site Cache: Also known as page cache or HTTP cache, this involves data stored by the website to enhance loading speed.
- Server Cache: This includes elements stored on your hosting server or through a Content Delivery Network (CDN).
When you visit a website, your browser downloads and saves some of its elements as cache files. This allows for quicker loading upon subsequent visits. However, if you’ve made recent changes to your site and can’t see them immediately, it’s likely due to this cached content.
Steps to Clear Your WordPress Cache
Follow these steps to effectively clear your WordPress cache:
1. Clear Your Browser Cache
Begin by clearing your browser cache. This process varies by browser, so refer to your browser’s help section for specific instructions.
2. Clear Cache Using a Caching Plugin
If you’re using a caching plugin on your WordPress site, you’ll need to clear its cache as well. Popular caching plugins include:
- WP Rocket
- WP Super Cache
- W3 Total Cache
Instructions for clearing cache with these plugins can be found in the sections below.
3. Clear the Server Cache
Many hosting providers implement server-side caching. The ability to manage this cache will depend on your host. Check your hosting settings for an option to clear the server cache. If none are available, reach out to your hosting support for guidance.
Example: Clearing Cache on SiteGround
If your site is hosted on SiteGround, you can clear the cache in two ways:
- From the Hosting Dashboard: Log in to your SiteGround account, navigate to Speed > Caching in the site tools. Switch to the Dynamic Cache tab, click the menu icon next to your domain, and select Flush Cache.
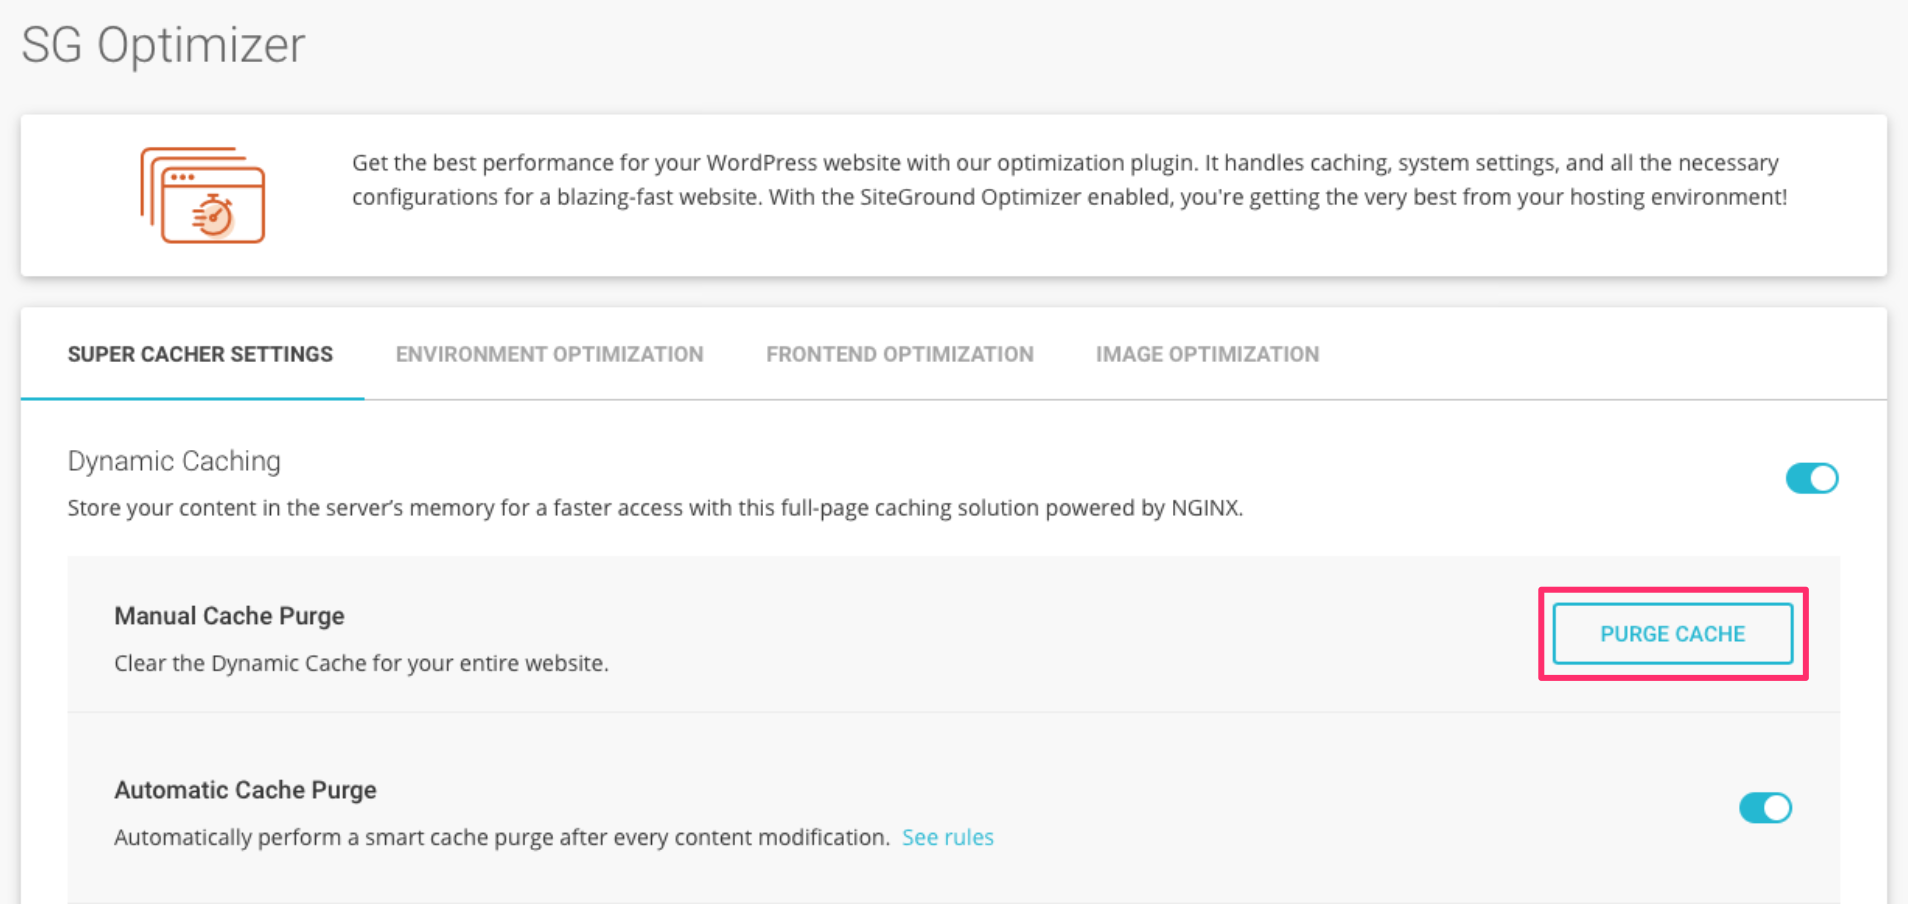
- From the WordPress Dashboard: Install and activate the SG Optimizer plugin. Under the Super Cacher Settings tab, click Purge Cache.
Working with Popular Caching Plugins
Here’s how to clear the cache for some widely used WordPress caching plugins:
Clearing Cache with WP Rocket
Ensure the WP Rocket plugin is installed and activated. Navigate to Settings > WP Rocket > Dashboard and click the Clear Cache button to remove all cached files.
Clearing Cache with WP Super Cache
With the WP Super Cache plugin activated, go to Settings > WP Super Cache and click Delete Cache to eliminate all cached files.
Clearing Cache with W3 Total Cache
For the W3 Total Cache plugin, make sure it’s activated. Then, go to Performance > Dashboard and click the Empty All Caches button to clear all cached content from your site.
By following these steps, you can ensure that your WordPress site reflects the latest changes you’ve made, enhancing both performance and user experience.