Addressing Cumulative Layout Shift (CLS) Issues in WordPress: Understanding, Diagnosing, and Fixing for Improved UserExperience
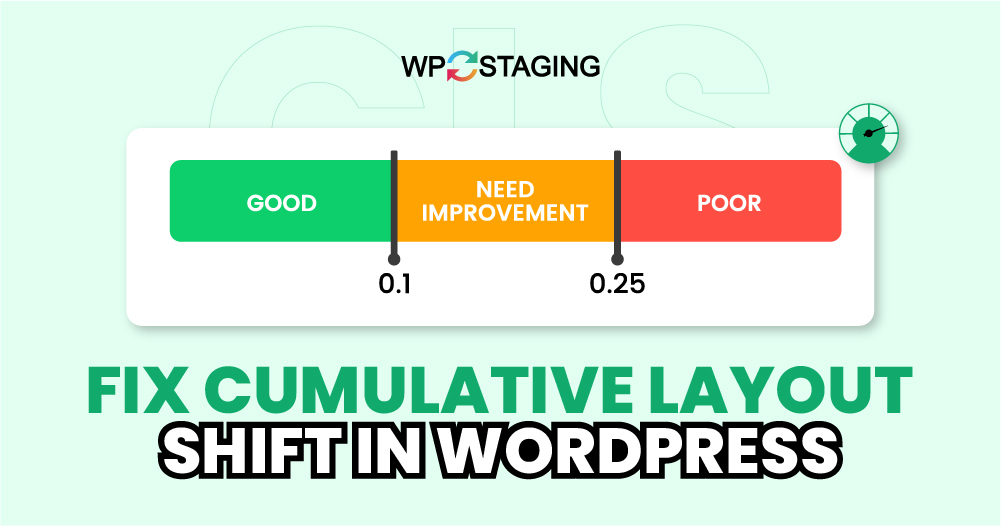
Understanding and addressing Cumulative Layout Shift (CLS) is essential for anyone managing a WordPress site. CLS is a crucial metric that gauges the visual stability of a webpage by tracking unexpected layout shifts that users encounter during their browsing experience. A high CLS score can lead to user frustration, negatively impacting engagement and overall satisfaction with your website.
What is Cumulative Layout Shift?
Cumulative Layout Shift refers to the unanticipated movement of elements on a webpage as it loads. This can occur when resources load asynchronously or when new elements are dynamically inserted above existing content. Such shifts can disrupt the user experience, leading to confusion or accidental clicks.
CLS is part of Google’s Core Web Vitals, a set of metrics that assess user experience and influence search engine optimization rankings. Common causes of high CLS scores in WordPress include:
- Images without defined sizes: Images that lack specified width and height dimensions can cause unexpected shifts when they load.
- Dynamic content: Ads, embedded videos, and iframes that do not have fixed dimensions can lead to layout instability.
- Dynamically injected content: Elements that appear after the main content can push other elements around, causing shifts.
- Web font loading issues: Custom fonts can trigger flashes of invisible text (FOIT) or flashes of unstyled text (FOUT), resulting in layout changes.
Diagnosing CLS Issues in WordPress
Before you can effectively resolve CLS issues, it’s important to identify them. Here are some tools you can use to diagnose CLS problems:
- Google Lighthouse: This tool, part of Chrome DevTools, performs automated audits, including performance checks that help identify CLS issues and suggest remedies.
- Chrome DevTools: By utilizing the Performance panel, you can observe layout shifts in real time and pinpoint problematic elements.
- Google PageSpeed Insights: This tool provides comprehensive reports on your website’s performance, highlighting any CLS-related issues.
- Web Vitals Chrome Extension: This extension measures Core Web Vitals, including CLS, in real-time for your pages.
- GTmetrix: GTmetrix delivers detailed reports on CLS and other performance metrics, helping you track improvements over time.
5 Effective Strategies to Fix Cumulative Layout Shift in WordPress
1. Set Fixed Dimensions for Media
To mitigate unexpected layout shifts, ensure that all images and videos on your site have defined dimensions. Here’s how:
- Log into your WordPress dashboard and navigate to the relevant post or page.
- If adding a new image, click the “+” icon to add a block, search for the Image widget, and insert it. For existing images, click on the image in the editor.
- In the Block settings on the right sidebar, manually enter the image’s width and height in pixels.
- Consider using CSS aspect ratio boxes to reserve space for images and videos, helping minimize layout shifts.
2. Host and Preload Local Fonts
To enhance loading speed and avoid layout shifts related to fonts, host fonts directly on your site. This can be done using plugins like OMGF. Follow these steps:
- In your WordPress dashboard, go to the Plugins section and click on ‘Add New’.
- Search for “OMGF,” install, and activate the plugin.
- In the Settings tab, select “Optimize Google Fonts” and set the Font-Display option to “Swap.” Save your changes.
3. Preload Your Fonts
Quick font loading is vital to prevent shifts. Use WP Rocket to preload fonts effectively:
- Install and activate the WP Rocket plugin from your dashboard.
- Navigate to the “Settings” tab and select WP Rocket.
- Go to the “Preload” tab and paste the URLs of your fonts into the designated field. Save your changes.
4. Minimize Dynamically Injected Content
To enhance stability and minimize layout shifts, limit the use of dynamically injected elements like ads and pop-ups:
- Reduce the overall number of these elements.
- Reserve space in your CSS by setting fixed dimensions for dynamic content.
- Utilize placeholders that match the size of the dynamic elements to maintain layout consistency.
5. Implement Lazy Loading
Lazy loading defers the loading of images, videos, and iframes until they are within the viewport, reducing initial load time and minimizing CLS. To enable lazy loading with WP Rocket:
- After installing and activating WP Rocket, go to Settings > WP Rocket.
- In the Media tab, enable lazy loading for images, iframes, and videos.
- Save your changes to optimize loading performance.
By implementing these strategies, you can significantly improve the user experience on your WordPress site, ensuring a smoother and more engaging browsing experience for your visitors.
